Showing posts with label crochet. Show all posts

Tuesday, January 8, 2013

A couple of projects I finished up over the weekend.

Fuzzy Purple Hat

We'll start with the hat, as modeled my wife.  I forget what look she was going for, but there you have it. All she needs is some cats-eye glasses to complete the retro look.


I bought a couple of skeins of Yarn Bee Haute Fur on clearance at Hobby Lobby, thinking to make a monster or two when with a skein of aubergine Red Heart With Love that migrated from my wife's stash to mine.

I was told that I'm not allowed to buy any more yarn until I clear my stash a bit, and the Haute Fur was low-hanging fruit.  Rather than create monsters, I whipped out a hat. Then another.

The hat is heavy, and a bit warm for Nashville's typical winter, but it is fun to wear.  I'm not sure who will wind up with them, but if I have no takers, I can always add straps and a face. 

Voila!  A handbag!

  • Yarn: 
    • Red Heart With Love - Aubergine (  .2 skein ~ 77 yards )
    • Yarn Bee Haute Fur - Grapette ( 1 skein ~ 93 yards, with a wee bit left over )
  • Hook: I/5.5mm
  • Time: 5 hrs
  • Construction:  There is no pattern - it's just a beanie/toque worked in the round, top down, with double crochet. I crocheted with both yarns from the beginning, and increased one row beyond my intended size (on accident), then slowly reduced the rows until I had my desired length. The result is a bit bulbous, but with some finagling, it can be worn several different ways.


Percy the Penguin with Junior

The other project is from a pattern I found on Ravelry and purchased through Etsy.  Percy is larger than I expected, but he'll sit nicely on the shelf above our television.  Junior is absolutely adorable, and I've already had a few requests for both. (That'll teach me to post pics on Facebook!)

  • Yarn: Red Heart Solids - Black ( .5 skein ), Red, Green, White, and Heather
  • Hook: G / 4.0mm
  • Time: 20hrs
  • Extras: Fiberfill ( 3.6 oz), Safety Eyes ( pattern calls for 6 mm, but since I made him larger than the design, I used 9mm ), yarn needle
  • Construction: Since it's a purchased pattern, I can't give many details other than it's worked in the round. Well written pattern, though. You can get your own here: http://www.etsy.com/shop/WollMafia

Saturday, December 22, 2012

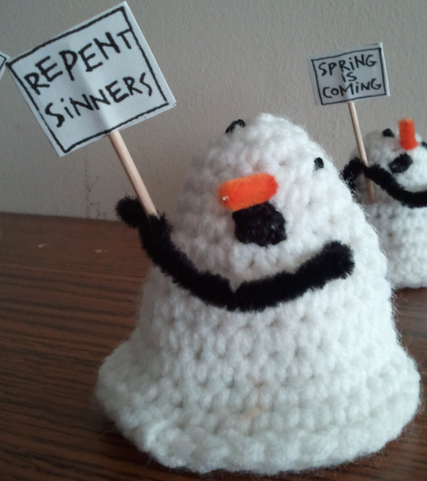
Snowman Prophets


Snowman Prophets
Inspired by the Calvin and Hobbes comic from March 8, 1993.


Anybody can make a snowman, but it takes a special kind of person to come up those that Calvin built in Bill Watterson’s Calvin and Hobbes comic.

This pattern is free, as in beer, and may be copied, re-posted, given away, chiseled in stone or otherwise distributed as long as you do the following:

    • Include a link to the original pattern.
    • Keep the copyright at the bottom.
    • Acknowledge Bill Watterson’s genius.
    • Most importantly, GIVE it away for FREE.

By all means, make these for your fellow Calvin and Hobbes fans or otherwise demented friends, but please don’t charge for them.

Why free?  I can’t say it better than sukigirl did about her Hobbes pattern:
”The reason he is free is because the creator of Calvin and Hobbes, Bill Watterson did not want to commercialize his work. Keeping that in mind, please don’t sell this pattern and don’t sell the completed work. I feel that part of enjoying Calvin and Hobbes is also respecting the man who created it. So this pattern is offered to people who want to make Hobbes for themselves or a loved one.


Materials
  • Yarn: Worsted weight (I used Red Heart Solids, White)
  • Hook: G/4.0mm
Extras
  • Scrap of yarn or stitch marker for indicating beginning of Round (HIGHLY recommended)
  • Yarn needle and/or embroidery needle
  • Embroidery thread or yarn for features
  • Chenille stems (orange and brown or black) for the nose and arms
  • Toothpicks or skewers for signposts
  • Scissors, paper, marker, glue for the signs. I don’t recommend glue sticks, because they don’t hold the toothpick/skewer very well.
  • The ability to count, and the patience to sustain you through frogging because your round is off (Experience is a cruel teacher, although it doesn’t really matter. We’re making deformed snowmen, aren’t we?)

Abbreviations
ch - Chain
sc - Single Crochet
dec - Single crochet decrease ( one sc through two stitches)
FO - Finish of


Signs (x3)

  1. Cut a rectangle out of cardstock or paper (I used index cards) as high and twice as long as you want your finished sign.
  2. Letter your sign (alternately, print them onto the cardstock before cutting)
  3. Fold the sign rectangle in half.  Place a toothpick/skewer in the center of the sign and glue the sides together.
  4. Insert the base of the sign into the body and rest against one of the arms.


Base (x3 - one per snowman)

Start with a magic circle or ch3/join, etc
Round 1 6 sc through circle ( 6 )
Round 2 2 sc in ea ( 12 )
Round 3 2 sc in ea ( 24 )
Round 4 [1 sc in first three, 2 sc in fourth] * 6 (30)
Round 5 [1 sc in first four, 2 sc in fifth] * 6 (36)
FO leaving a long tail for attaching to the body.


Snowman 1


Start with a magic circle or ch3/join, etc.
Round 1: 6 sc through the circle  (6)
Round 2: 2 sc in each st ( 12 )
Round 3: [1 sc in first, 2 sc in second] * 6 ( 18 )
Round 4-5: (2 rounds) 1 sc in ea sc ( 18 )
Round 6: [1 sc in first, dec] * 4; 1 sc in ea sc ( 14 )
Round 7: [ 1 sc in first, 2 sc in second] * 4; 1 sc in ea sc ( 18 )
Round 8: [ 1 sc in first two, 2 sc in third] * 6 (24)
Round 9:1 sc in ea sc ( 24 )
Round 10: [1 sc in first three, 2 sc in fourth] * 6 ( 30 )
Round 11: [1 sc in first four, 2 sc in fifth] * 6 ( 36 )
FO and weave in tail (or not - it can be tucked into the body)
Sew on features, add the arms (optional - see below) then fill
Sew or slipstitch the base to the body.
Finish with pieces of chenille stems for arms and a sign.


Snowman 2


Start with a magic circle or ch3/join, etc
Round 1: 6 sc through the circle  (6)
Round 2: 2 sc in each st ( 12 )
Round 3: [1 sc in first, 2 sc in second] * 6 ( 18 )
Round 4-5: (2 rounds) 1 sc in ea sc ( 18 )
Round 6: [1 sc in first, dec] * 4; 1 sc in ea sc ( 14 )
Round 7: [1 sc in first, 2 sc in second] * 4; 1 sc in ea sc ( 18 )
Round 8: [1 sc in first two, 2 sc in third] * 6 (24)
Round 10-11: (2 rounds) 1 sc in ea sc ( 24 )
Round 12: [1 sc in first two, dec] * 4; 1sc in ea sc ( 20 )
Round 13: [1 sc in first two, 2 sc in second] * 4; 1 sc in ea sc (24)
Round 14: [1 sc in first three, 2 sc in fourth] * 6 ( 30 )
Round 15: 1 sc in ea sc (30)
Round 16: [1 sc in first four, 2 sc in fifth] * 6 ( 36 )
Round 17: 1 sc in ea sc (36)
FO and weave in tail (or not - it can be tucked into the body)
Sew on features, add the arms (optional - see below) then fill
Sew or slipstitch the base to the body.
Finish with pieces of chenille stems for arms and a sign.


Snowman 3


Start with a magic circle or ch3/join, etc
Round 1: 6 sc through the circle  (6)
Round 2: 2 sc in each st ( 12 )
Round 3: [1 sc in first, 2 sc in second] * 6 ( 18 )
Round 4-5: (2 rounds) 1 sc in ea sc ( 18 )
Round 6: [1 sc in first 12]; 2 sc in next six ( 24 )
Round 7-8: (2 rounds) 1 sc in ea sc ( 24 )
Round 9: [1 sc in first three, 2 sc in fourth] * 6 ( 30 )
Round 10: [1 sc in first four, 2 sc in fifth] * 6 ( 36 )
Round 11: 1 sc in ea sc ( 36 )
FO and weave in tail (or not - it can be tucked into the body)
Sew on features, add the arms (optional - see below) then fill
Sew or slipstitch the base to the body.
Finish with pieces of chenille stems for arms and a sign.


Adding the Arms
There are two ways to add the arms and nose - the easy way, or the secure way.  

The easy way is to cut two pieces of chenille stems for the arms, one for the nose and then poke them into the finished snowmen.  This is adequate as long as they snowmen don’t get handled or tossed about (think storage). You may have to re-attach the arms as they fall out, which isn’t difficult, but I find to be annoying.

The secure way is a little more complicated but results in arms and a nose that won’t fall out with rough handling.

Before stuffing:

  1. Place a small amount of stuffing in the head - just enough to fill the section above where the nose will join.
  2. Insert an uncut chenille stem through the body where you’d like the arms to be.  Adjust the ends and cut slightly longer than the desired length.
  3. Insert an uncut chenille stem into the face for the nose.  Carefully wrap the end two or three times around the crossbar formed by the arms. Cut slightly longer than you want the nose.
  4. Stuff and close. Stuffing may pull the nose/arms, which is why we cut them slightly longer than needed.
  5. Trim to the correct length and shape.


Pattern copyright 2012, Brian “BBQ” Sauls.
Bill Watterson is a creative genius.

http://bbqcrochets.blogspot.com/2012/12/snowman-prophets-of-doom.html